NES Emulation in Rust: Designs and Frustrations
Jan 31, 2020 | 43 minute read
In Part 1, I went over the current state of my NES emulator project in Rust, and today I'll continue by going into the details of how the NES operates at a hardware level, and some of the constructs I used to emulate that with Rust.
Emulator In-Depth
Clocking
The NES contains several hardware components that can perform computations (CPU, PPU, APU, and Cartridge). In order to ensure everything communicates and coordinates properly, a clock is required to keep them in sync. Nintendo released multiple versions of the NES in different regions, with different hardware containing differing clock timing. In the United States, for example, the NES used the NTSC television standard with an RP2A03 CPU while the consoles released in Europe followed the PAL standard and used a RP2A07 CPU. Both the television standard and the chosen hardware for that region affect the timing and methods for generating the NES video. I'll primarily be referencing NTSC for the remainder of this article since that's the NES I grew up with and emulated, though there are many differences for the PAL and Dendy versions which I have not emulated. The NTSC NES had a master clock of 21.477272 MHz which was divided by each component for it’s own use as outlined below:
| Component | Divider | Speed |
|---|---|---|
| Master | 1:1 | 21.477272MHz |
| CPU | 1:12 | 1.789773MHz |
| PPU | 1:4 | 5.369318MHz |
| APU | 1:24 | 0.894886MHz |
Additionally, the APU uses an internal Frame Counter, separately from it's clock, that it uses to clock it's multiple components like the Pulse and Triangle channels every quarter and half-frames. The APU is arguably the most complicated to emulate the clock timing for.
Thus, with a clock pulse being so critical to the proper emulation of the NES, I set about creating a Clocked trait.
pub trait Clocked {
    fn clock(&mut self) -> usize {
        0
    }
}
This trait would be implemented for every major component: CPU, PPU, APU, and even some Mappers.
Calling this clock() function would advance that component by the smallest,
reasonably discrete step possible. The CPU, for example, would execute one full
instruction. Here comes the first rub: in the original NES hardware, all of the
components are running in parallel with each other, so the PPU, APU or Mapper
could read/update values on their address or data buses during the middle of a
CPU instruction.
Most emulators ignore this for performance reasons and simply do some level of
"catch-up" by running the CPU for a bit, then running the PPU/APU/Mapper to
catch up. By alternating back and forth between the components, you get fairly
accurate emulation. This is what my initial implementation did, but recently I
wanted to make TetaNES as cycle-accurate as possible and so every time clock()
is called on the CPU - one full instruction is executed which may include
several sub-instructions. Every instruction on the CPU involves either a read
from or a write to memory. Before that read or write is done, the CPU caches up
the PPU, APU, and Mapper so that if those components read or update a value, the
correct read or write is performed.
Memory Mapping
The next big component of the NES is how it maps available memory using it’s limited 16-bit address space. Note that while the address space is 16-bits, the data bus was limited to only 8-bits at a time. Both the CPU and PPU had separate memory maps as outlined below:
--------------------- $10000   --------------------- $10000

                                PRG-ROM Upper Bank

                               --------------------- $C000

Cartridge Space                 PRG-ROM Lower Bank

                               --------------------- $8000
                                SRAM
                               --------------------- $6000
                                Expansion ROM
--------------------- $4020    --------------------- $4020
                                APU & I/O Registers
                               --------------------- $4000

 I/O Registers                  Mirrors $2000-$2007

                               --------------------- $2008
                                PPU Registers
--------------------- $2000    --------------------- $2000

                                Mirrors $0000-$07FF

                               --------------------- $0800
 RAM                            RAM
                               --------------------- $0200
                                Stack
                               --------------------- $0100
                                Zero Page
--------------------- $0000    --------------------- $0000
--------------------- $10000   --------------------- $10000

 Mirrors $0000-$3FFF            Mirrors $0000-$3FFF

--------------------- $4000    --------------------- $4000

                                Mirrors $3F00-$3F1F

 Palettes                      --------------------- $3F20
                                Sprite Palette
                               --------------------- $3F10
                                Background Palette
--------------------- $3F00    --------------------- $3F00

                                Mirrors $2000-$2EFF

                               --------------------- $3000
                                Attribute Table 3
                               --------------------- $2FC0
                                Name Table 3
                               --------------------- $2C00
                                Attribute Table 2
 Name Tables                   --------------------- $2BC0
                                Name Table 2
                               --------------------- $2800
                                Attribute Table 1
                               --------------------- $27C0
                                Name Table 1
                               --------------------- $2400
                                Attribute Table 0
                               --------------------- $23C0
                                Name Table 0
--------------------- $2000    --------------------- $2000
                                Pattern Table 1
 Pattern Tables                --------------------- $1000
                                Pattern Table 0
--------------------- $0000    --------------------- $0000
That looks complicated and it sort of is, but it helps if we clarify some terminology.
- PRG-ROM: Program Read-Only Memory. The PRG-ROM is broken up into two parts which are generally referred to as PRG-ROM and CHR-ROM or Character Read-Only Memory. PRG-ROM is all the logic of the game. Rules, physics, control-flow, etc, while CHR-ROM is all the sprite and image data.
- Bank: A fixed or swappable "view" of memory. As mentioned, the NES is
limited to a 16-bit address space which isn't very big. While this was enough
for some early NES titles, it limited the size of games and so various
cartridges added extra hardware (called Mappers) to be able to swap out banks
of memory so that while the NES is referencing the same memory addresses in
the range
$8000-$FFFF, it's actually reading different addresses from the much larger address range provided on the cartridge. - SRAM: Save Random-Access Memory. This was battery-backed memory that could persist between play sessions. Not all cartridges had this, but games like The Legend of Zelda used it for it's save slots.
- Expansion ROM: Very few cartridges used this area. It was primarily used to add extra features to the NES like sound-processing, or extra Name Tables.
- I/O: Input/Output. This includes the PPU, APU, and Controller.
- Sprite: These are the moving entities in the game, primarily the player character, enemies, projectiles, etc.
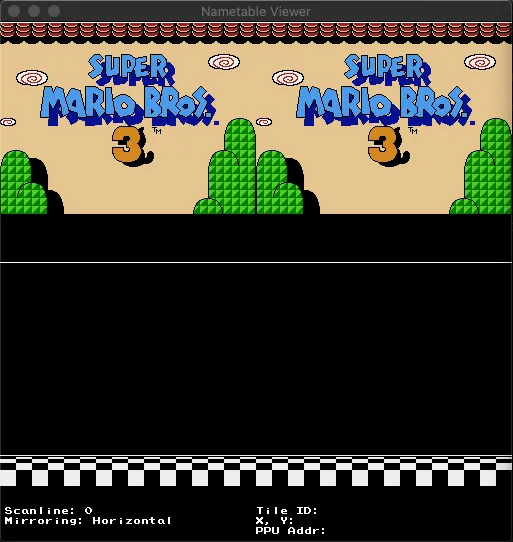
- Name Table: These are the background scenes for each level. The NES had internal memory enough for two Name Tables at a time, but had address space for four. This allowed the NES to use a Name Table Mirroring technique which allowed games to swap between Name Tables for use in scrolling the level (More on this later).
- Attribute Table: Each Name Table had an attribute table that mapped palette colors to areas of the Name Table.
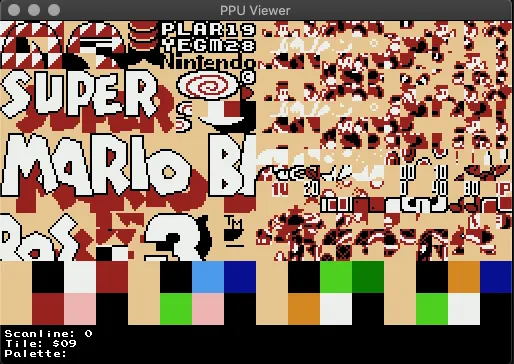
- Pattern Table: These contain image patterns used in constructing sprites.
The Pattern, Attribute, and Name Tables are all populated from the CHR-ROM portion of the cartridge and can be swapped around as necessary during gameplay. In order to construct this mapping, I came up with a Bus struct that contains the various components:
pub struct Bus {
    pub ppu: Ppu,
    pub apu: Apu,
    pub mapper: MapperRef,
    pub input: Input,
    pub wram: Memory,
}
The CPU struct holds a copy of this Bus in order to read/write data from it. There are likely other or better ways to structure things given that the CPU only really needs access to registers on the PPU/APU and not the entire object itself. I could have also split out the Mapper/Cartridge into PRG-ROM and CHR-ROM so that it did not need to be shared between the CPU and PPU, but that may be a project for another day.
The MapperRef above is defined as pub type MapperRef = Rc<RefCell<dyn Mapper>>. It's a bit wordy for sure.
To explain it, there are two things to know:
- At compile time we don't know what type of Mapper is going to be loaded
because it depends on the individual game cartridge being played. A dynamic
trait object is a solution for this. The Mapper trait defines a set of
methods that can be called on any concrete Mapper such as reading/writing
data to it or determining if an IRQ is pending. The
dynkeyword means it's a dynamic object loaded at run time. - The Rc/RefCell means that I'm placing the Mapper object behind a mutable
memory location with dynamically checked borrow rules. The Rc is a Reference
Counted data structure that allows multiple owners of an object by calling
clone()on it. Once all references go to zero, the dynamic memory can be freed. This setup also ensures that only one part of the system can get a mutable copy at a time by calling eitherborrow()orborrow_mut(). There is some performance overhead with this, but the alternative is a lot of unsafe Rust code to allow shared access to data.
wram above stands for Work RAM which is the 2KB worth of internal memory
available to the CPU for processing.
CPU
The Central Processing Unit is the work-horse of the NES and processes all the logic of a game including how to squish a Goomba or shoot a blaster. It follows a very simple paradigm in basic computing: Fetch, Decode, Execute, Repeat. The CPU uses a Program Counter (PC) to keep track of where in memory it's reading and executing instructions from.
When the NES is powered on or reset, the CPU defaults the PC to address
$FFFC. This is known as the Reset Vector and tells the NES where to start
reading instructions from. This address is in the Cartridge Space. From there it
decodes what the instruction is, executes it and increments the PC by the
correct amount based on the instruction. Different instructions increment the PC
by different amounts. The RP2A03 CPU was incredibly brilliant for it's time. It
was limited to only 256 unique instructions, but it had 12 different Addressing
Modes which could subtly change how the instruction operated leading to some
very efficient code.
PPU
The Picture Processing Unit handles all of the pixel-by-pixel calculations required to output a video signal. It runs at 3x the speed of the CPU. This is critical because the CPU can only run roughly 29,780 cycles per frame, but there are 61,440 pixels that need to be generated for NTSC (256x240) which means the CPU, by itself, is too slow to draw a full screen at the required 60hz refresh rate. Running at triple the speed allows the PPU enough time to generate all of the pixels and still have some idle time left over which is called the Vertical Blanking period (VBlank). Game designers use this period to have the CPU update values, change state, etc. Doing this in the middle of rendering would cause odd screen glitches and artifacts. The PPU by far was the most complicated component to emulate overall. NES designers used many varied mathematical tricks in order to get the most out of the hardware.
The PPU contained the following sub-components:
- Name Tables: Four virtual tables, two of them real with mirroring options. It specified 32x30 bytes which contain data for which 8x8 (or 8x16 depending on the mode) image pattern to use.
- Attribute Tables: Specifies with 4-color palette is used for each 16x16 tile area.
- Object Attribute Memory (OAM): Stores position, palette, and various properties (like whether it's inverted left/right or up/down) for sprites. There is a total of 64 unique sprites per frame, with a maximum of 8 active at any time. If you've ever noticed sprites flickering when playing the NES when there are a lot of enemies on the screen, this is the sprite limit being reached.
- Palette: 8 unique 4-color palettes, however the first is always transparent for each palette allowing a global background color to be available. There are a total of 64 unique NES colors to choose from, but only 32 can be chosen at a time that would fit within the 8, 4-color list.
The PPU and CPU are on different address spaces, but they still communicate with
each other. The CPU communicates to the PPU by reading from and writing to it's
available registers on addresses $2000-$2007 while the PPU can issue
Non-Maskable Interrupts (NMIs) to the CPU during end-of-scanline (also known as
Horizontal Blanking or HBlank) and VBlank periods. When these interrupts are
called, the CPU jumps to the NMI Vector address at $FFFA and begins executing
instructions before returning where it left off. This is what allows the CPU to
perform updates during VBlank.
While the PPU could address four Name Tables, it only had internal memory for two of them unless a mapper provided additional memory for this. This meant that Name Tables had to be mirrored. There were several mirroring modes depending on the Mapper:
- Vertical
- Horizontal
- Single Screen
- Four Screen (Mapper had to support this)
See here for examples of each mirroring type.
APU
The Audio Processing Unit handles all the music and noise production. It contains five channels which is then mixes together to create the classic 8-bit sound we all know and love:
- Two Pulse (or Square wave) generators
- A Triangle generator
- A Noise generator
- A Delta Modulation Channel (DMC) for playing Digital Pulse Code Modulation (DPCM) samples
Each channel is driven by a variable rate clock using a Frame Counter. The output of each channel is then combined and sent to the Digital-Analog-Converter of the NES.
Implementing this was fairly fun and while the clock timing is a bit hard to understand, the logic is not. During testing I added the ability to toggle various channels on or off and it was a real joy to see how each channel sounded in isolation and what it added to the overall effect when combined.
Mappers
The Mappers are arguable the single-most important component of the NES and what helped extend the lifetime and longevity of the NES way beyond what the initial hardware was capable of. By having each cartridge provide additional circuitry and hardware, games were able to add features and capabilities without requiring upgrades to the NES console. Nowadays with everything being either digital or on discs, consoles are limited to their original hardware.
Some functionalities Mappers provided:
- PRG-ROM/CHR-ROM Bank Switching (often)
- PRG-RAM/CHR-RAM that was sometimes battery backed (often)
- Name Table Mirroring (always)
- CPU Interrupt Requests (IRQs) (commonly)
- Additional Sound Generation (rarely)
- PPU Attribute alterations (rarely)
- Additional PPU Name Tables (rarely)
- Utilities (like fast multiplication) (rarely)
The boards that came out with the initial NES release were very basic. NROM was the first board created and was labeled as Mapper 0 (Super Mario Bros used NROM). It had either 16KB or 32KB of PRG-ROM and 8KB of CHR-ROM with no bank switching. Each game had a hard-wired Vertical or Horizontal mirroring. While there are hundreds of unique mappers, only 8 comprise roughly 85% of all NES titles published. Most of the other 15% are games released only in Japan so I have not spent much time implementing any other mappers.
Interrupts
As with any computing system that has components that need to interoperate, the NES had the ability to interrupt the CPU and request that it do some work. All of the major components could issue interrupts to the CPU. The APU and Mappers could issue regular IRQ interrupts and the PPU would issue NMIs which meant that the CPU could not ignore them.
One of the most difficult things in emulating the NES was getting the interrupts and their timing right. Without this, nothing works correctly. This is because game designers knew exactly how fast the NES would run and many games are very specific about the timing of events in order for their logic to happen correctly.
Development
The biggest hurdle with development early on was coming up with a workable architecture that allows the application to emulate mutable memory and address bus behavior. This was tough in Rust. I had to simultaneously learn how the NES hardware operated while trying to digest Rust's typing and borrow rules. I was unable to reference any of the C or C++ emulator implementations for assistance because most, if not all, of them use pointers (especially circular pointers) to handle this issue. Eventually, I settled on all of the major components (The APU, PPU, WRAM, and Mapper) going inside of a Bus struct that implements a Memory trait which has read/write methods. The CPU needs access to all of those components so it contains the Bus. The Nes struct holds onto the CPU and is responsible for clocking everything. The Mapper was the next big hurdle because there are multiple types of mappers that aren't known until the game cartridge is read at run time. I decided to wrap that into a Rc + RefCell so that I could share it among the APU, PPU, and CPU. The Nes also needed a copy since it handles reading/writing Save Ram (SRAM) for loading/saving game state.
Relating to Rust
Integers
Gotcha - during development, frame rates were so slow with the default
development build, so I was instead using --release. It turns out that integer
overflow checking is disabled by default during release builds. DOH! Many a bug
to be had early on. I had to update the opt-level to 2 for development builds to
speed things up and still keep those checks.
Ownership
Rust made sharing data across components very difficult. I spent many hours early on fighting with the compiler and eventually was able to come up with a design using Reference Counted objects as a way to share data safely.
Matching
Matching in Rust is such a joy to use and made the Bus module very clean since it allowed a straight forward way to encode the memory mapping outlined above:
fn read(&mut self, addr: u16) -> u8 {
    let val = match addr {
        0x0000..=0x1FFF => { .. } // Read wram
        0x2000..=0x3FFF => { .. } // Read PPU
        0x4000..=0x4015 => { .. } // Read APU
        0x4016..=0x4017 => { .. } // Read Input
        0x4018..=0x401F => { .. } // Read APU/ I/O
        0x4020..=0xFFFF => { .. } // Read Cartridge Space
    };
    val
}
There were some performance concerns with this, however, and while I'm not finished researching it, at present, I currently have the match arms sorted by what seem to be most commonly called. This is because the believe is that depending on how the compiler optimizes this, it's linearly searching down the match statements until it finds the correct arm. For such a short list like above, this may not be a concern but for the CPU opcode list which is 256 instructions long, it may be a substantial performance bottleneck. The reason I'm not finished researching is because it's unknown whether the compiler converts this to a simple jump table or not, in which case the order would not affect the lookup time.
Performance
I believe there's still a lot to be gained from performance increases. I've done several benchmarks on my laptop and there don't seem to be any obvious bottlenecks, and while I can get a fairly consistent 60 FPS on my several-year-old laptop, it's still not quite as fast as some of the C emulators out there. Specifically, I believe there could be some great dynamic programming or memoization techniques I could use to speed things up and I'm sure as Rust evolves, it's optimizations for certain target platforms will improve (I'm most interested in arm7 improvements).
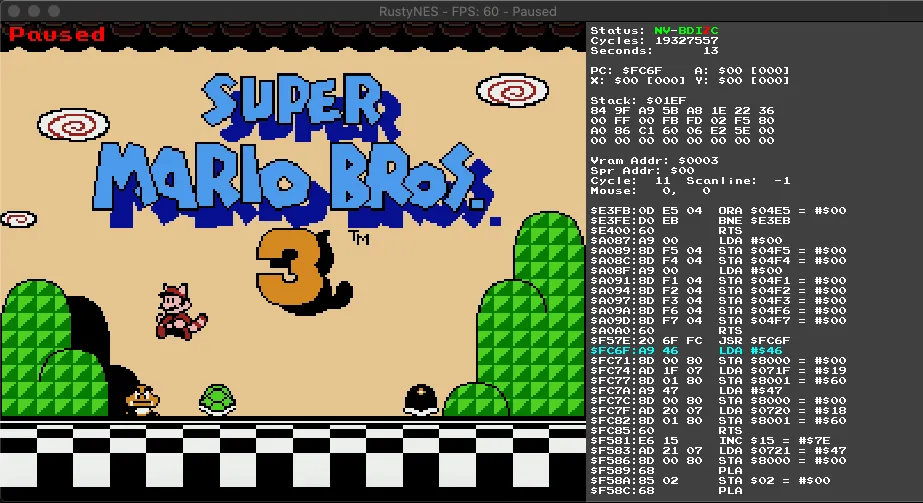
Testing & Debugging
Testing and debugging were paramount in getting a handle on the complexity of this project, especially when it came to subtle bugs or obscure behavior. I implemented the CPU first and the nestest was crucial in determining if my CPU instructions were executing correctly.
From there, I started building the PPU and relied extensively on other emulators debug features in order to compare to my own. I went so far as to build in my own debugging suite of tools and a whole drawing engine to render them with. Without these, I would have spent many more hours and may have gone insane.
Conclusion
This was a fantastic project and I learned so much. While I'm not actively working on this anymore, I do plan to continue tinkering with it and extending it over the years to come. There is much to be done and many feature improvements I'd like to add.
photo credit: Nintendo Entertainment System with controller via Evan-Amos - Public Domain